Which Hood Should You Choose? A Hoodie Brand’s Guide
Which Hood Should You Choose? A Hoodie Brand’s Guide
One-piece, two-piece or three-piece: which hood belongs on your hoodie?
Start with the appearance you want, then approve the fit on a physical sample. Panel count describes how the hood is constructed; it is not a quality grade.
For a cleaner crown, explore a one-piece construction. If you want a visible center-seam layout, start with a two-piece hood. If you want a distinct center panel, explore a three-piece hood. These are starting points for development, not promises about comfort, price or how every finished hoodie will look.
The useful question is not “Which has the most pieces?” It is “Which construction, fabric and proportions produce the result my customer wants?” Every option below can be produced on our custom heavyweight hoodie program - from 100 pieces, DDP to the USA and EU.
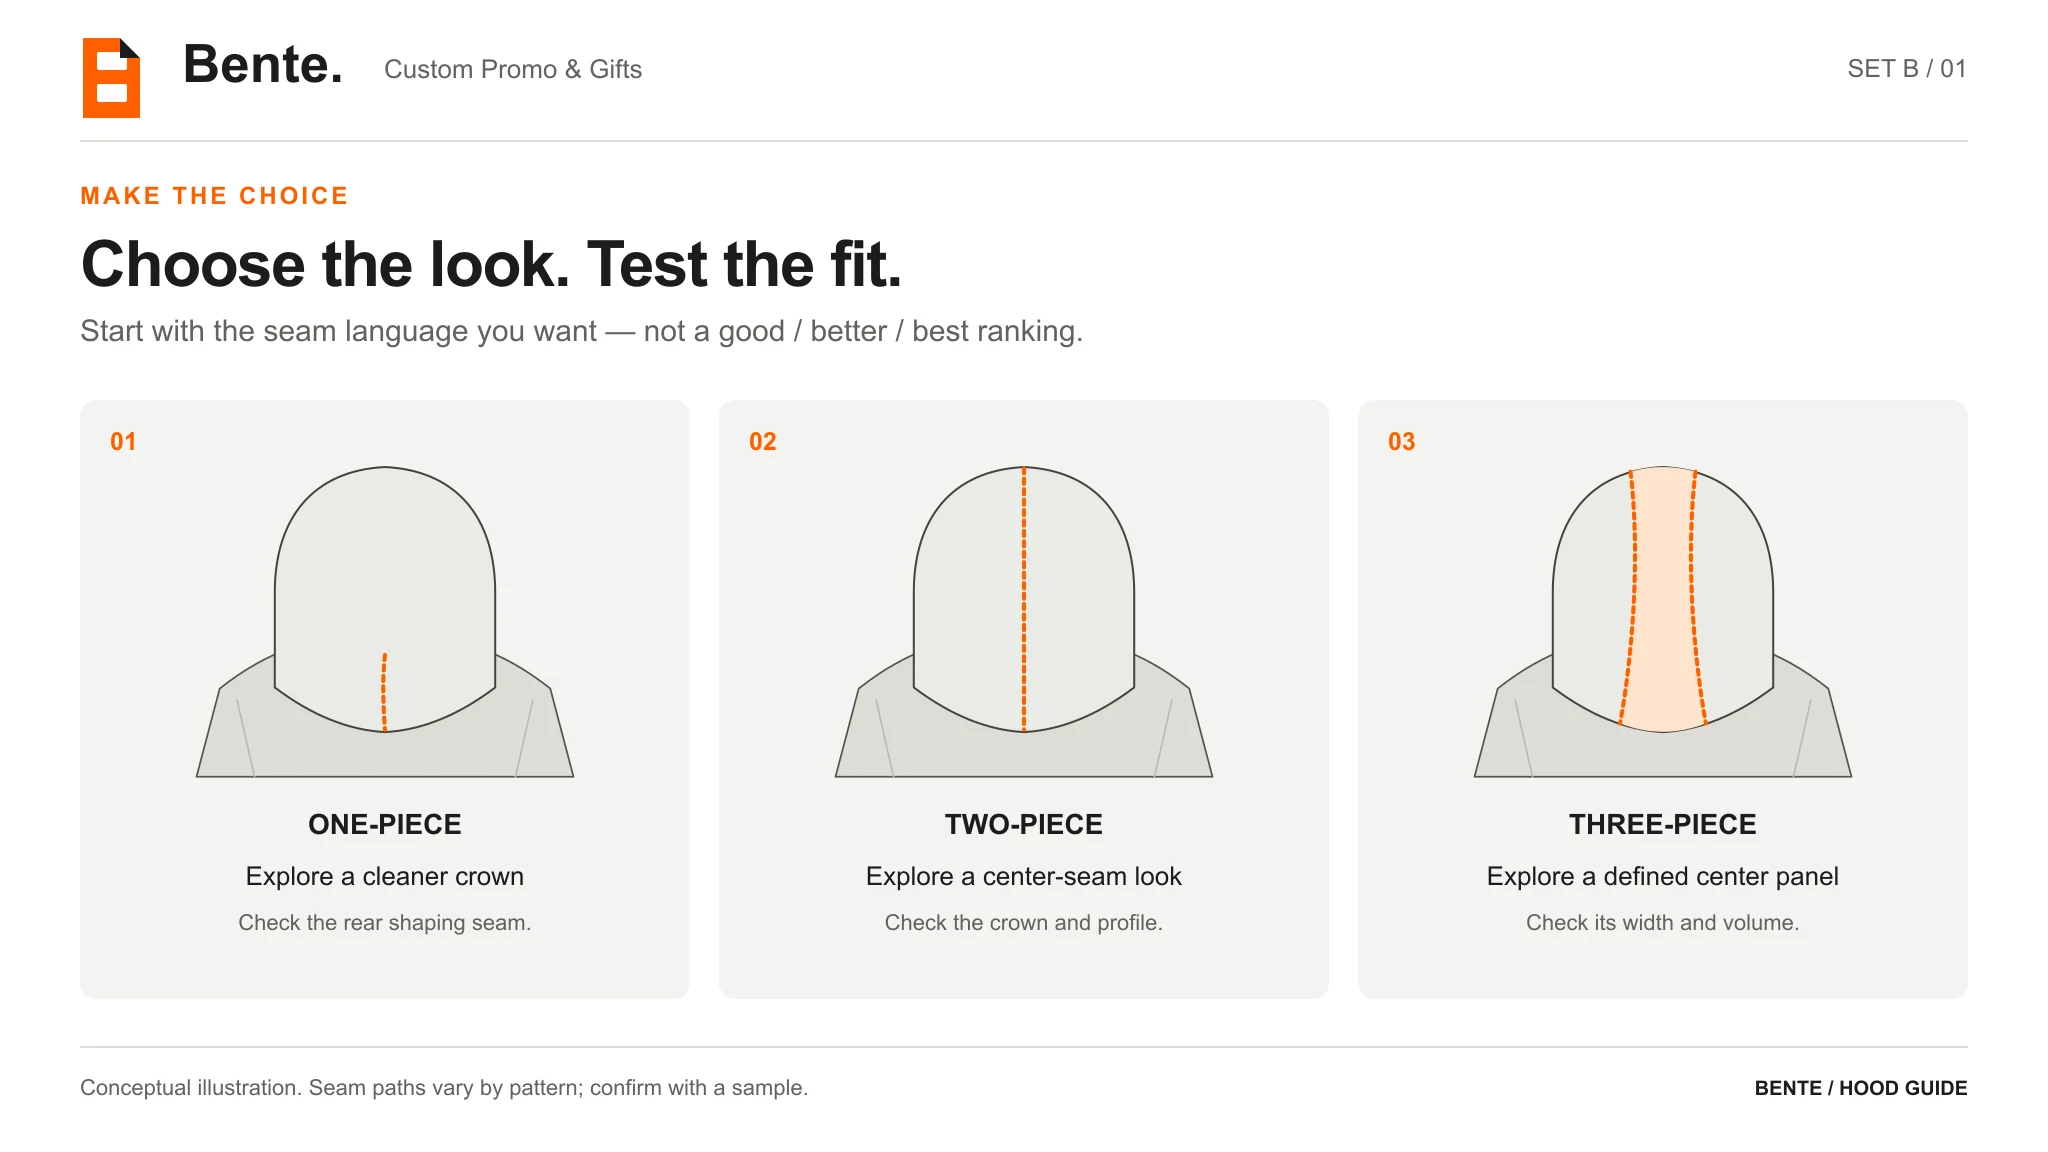
Conceptual construction examples. Orange identifies seams or a center panel; it does not specify production thread or fabric color.
First, separate panels from layers
In this guide, one-piece, two-piece and three-piece refer to the pieces forming one outer hood shell.
A lining is a separate decision. A two-piece outer hood can still have a lining. A three-piece outer hood is not a “three-layer hood.” A single paper pattern shape may also be cut as mirrored pieces, so the number of paper templates is not necessarily the number of fabric pieces.
When discussing the design with a factory, use a sketch or a reference photo alongside the name. Mark the seam positions and explain whether you are describing the outer shell, the lining or both. That is clearer than asking for “the premium hood.”
One-piece hood: explore a cleaner crown
A one-piece hood uses a continuous piece of fabric for the shell. Folding and shaping that piece produces the hood form.
In the example shown in the reference video, the crown has no full-length central joining seam, but there is a shorter shaping seam toward the back. One-piece does not mean seamless. Do not assume every pattern sold under this name has exactly the same rear seam arrangement.
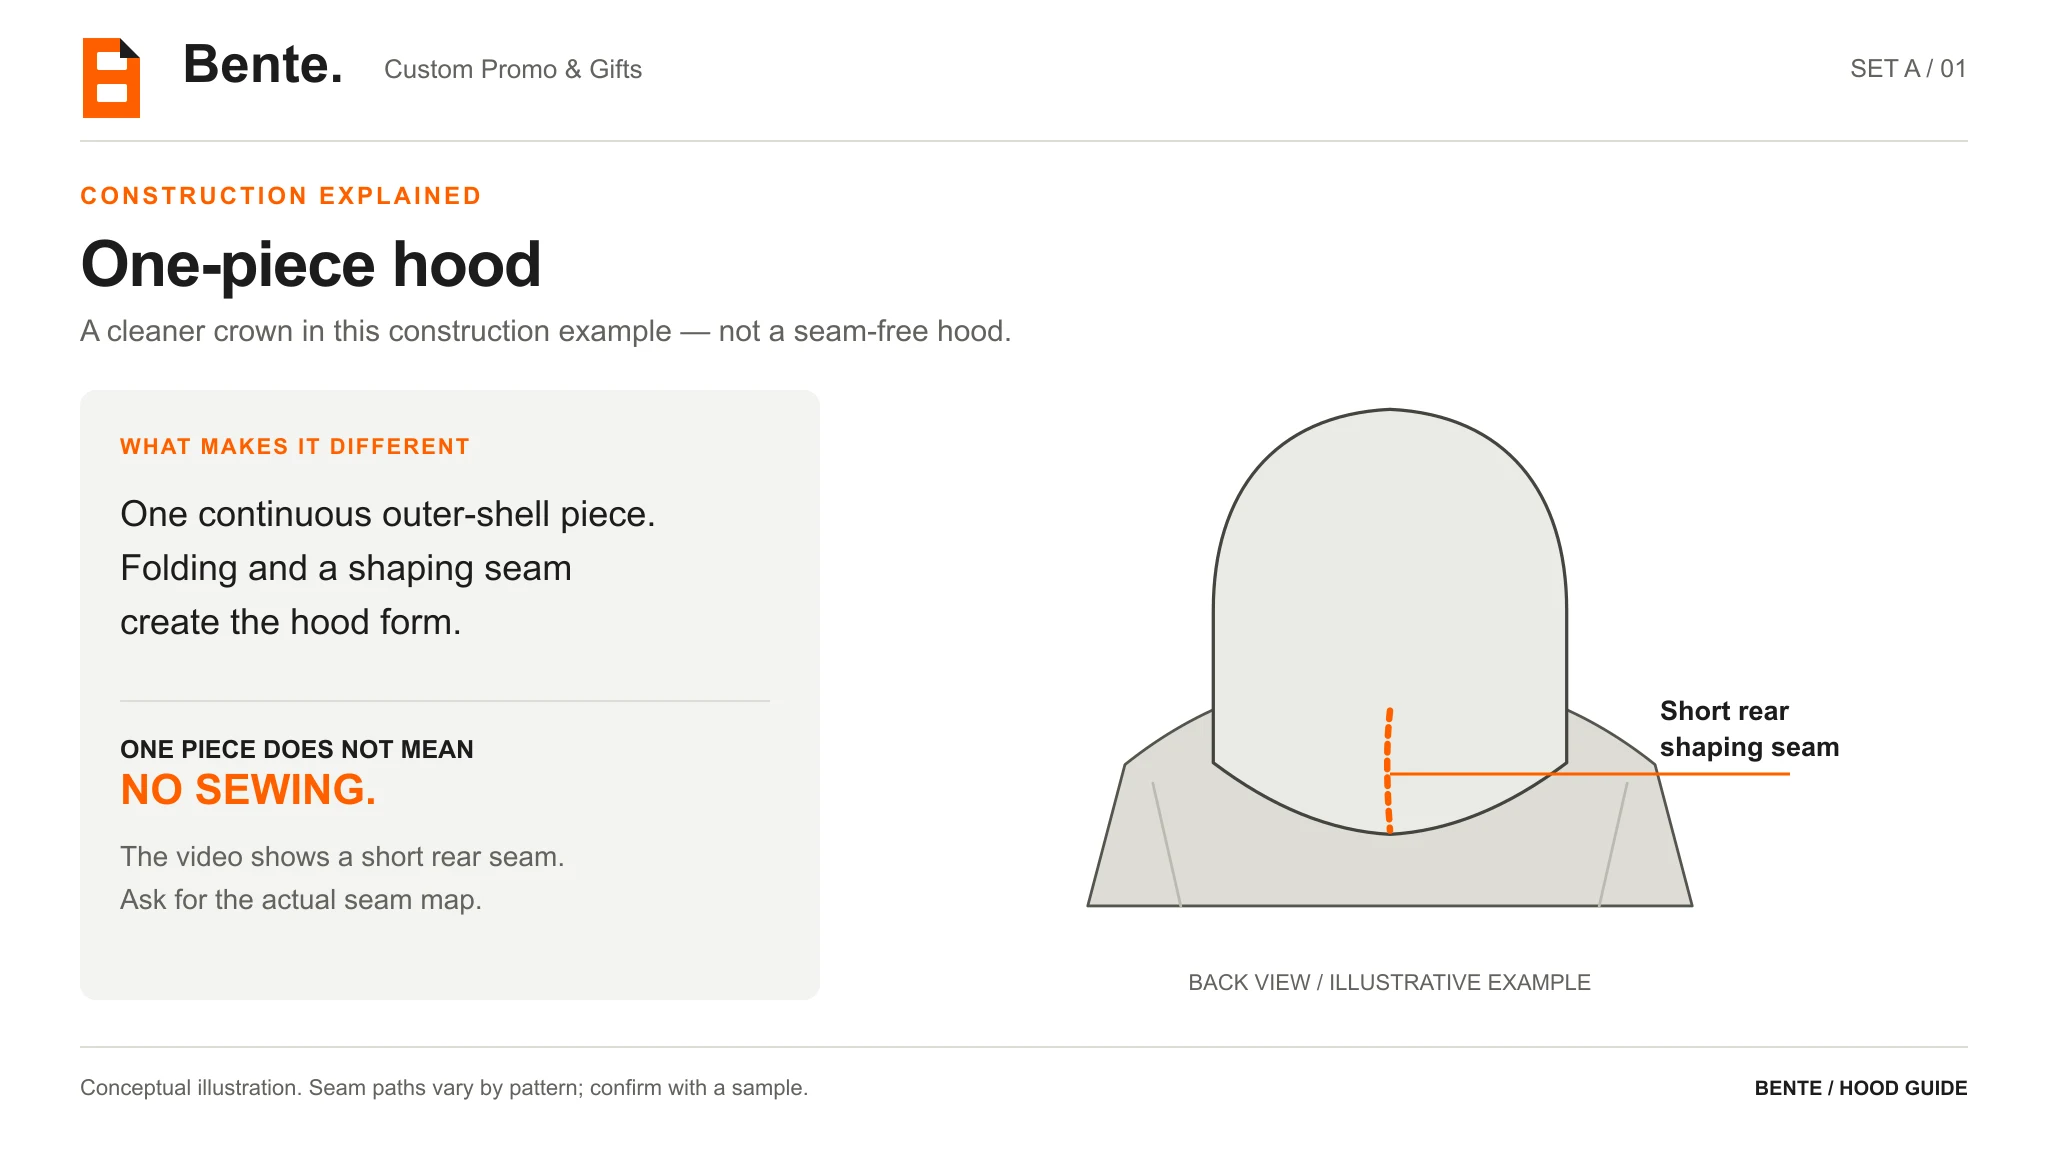
Set A / 01: a simplified interpretation of the one-piece example, not a cutting pattern.
Put it on your shortlist when: your design brief prioritizes a relatively uninterrupted crown and a restrained seam layout.
Ask the factory: “Where does the shaping seam start and finish? Please show the hood from the front, side and back, both raised and resting on the shoulders.”
Check the sample: Does the crown look the way you intended? Does the back shaping seam create a visible point or fold you dislike? Does the hood still suit the garment when it is down?
Do not approve or reject this option just because its unsewn piece looks unusual. Judge the assembled hood attached to the intended neckline.
Two-piece hood: explore a center-seam layout
A two-piece hood uses two mirrored side panels. Their curved edges join to form a seam running over the crown and toward the back.
The key distinction is simple: the left and right sides meet directly at the center. There is no separate center strip between them.
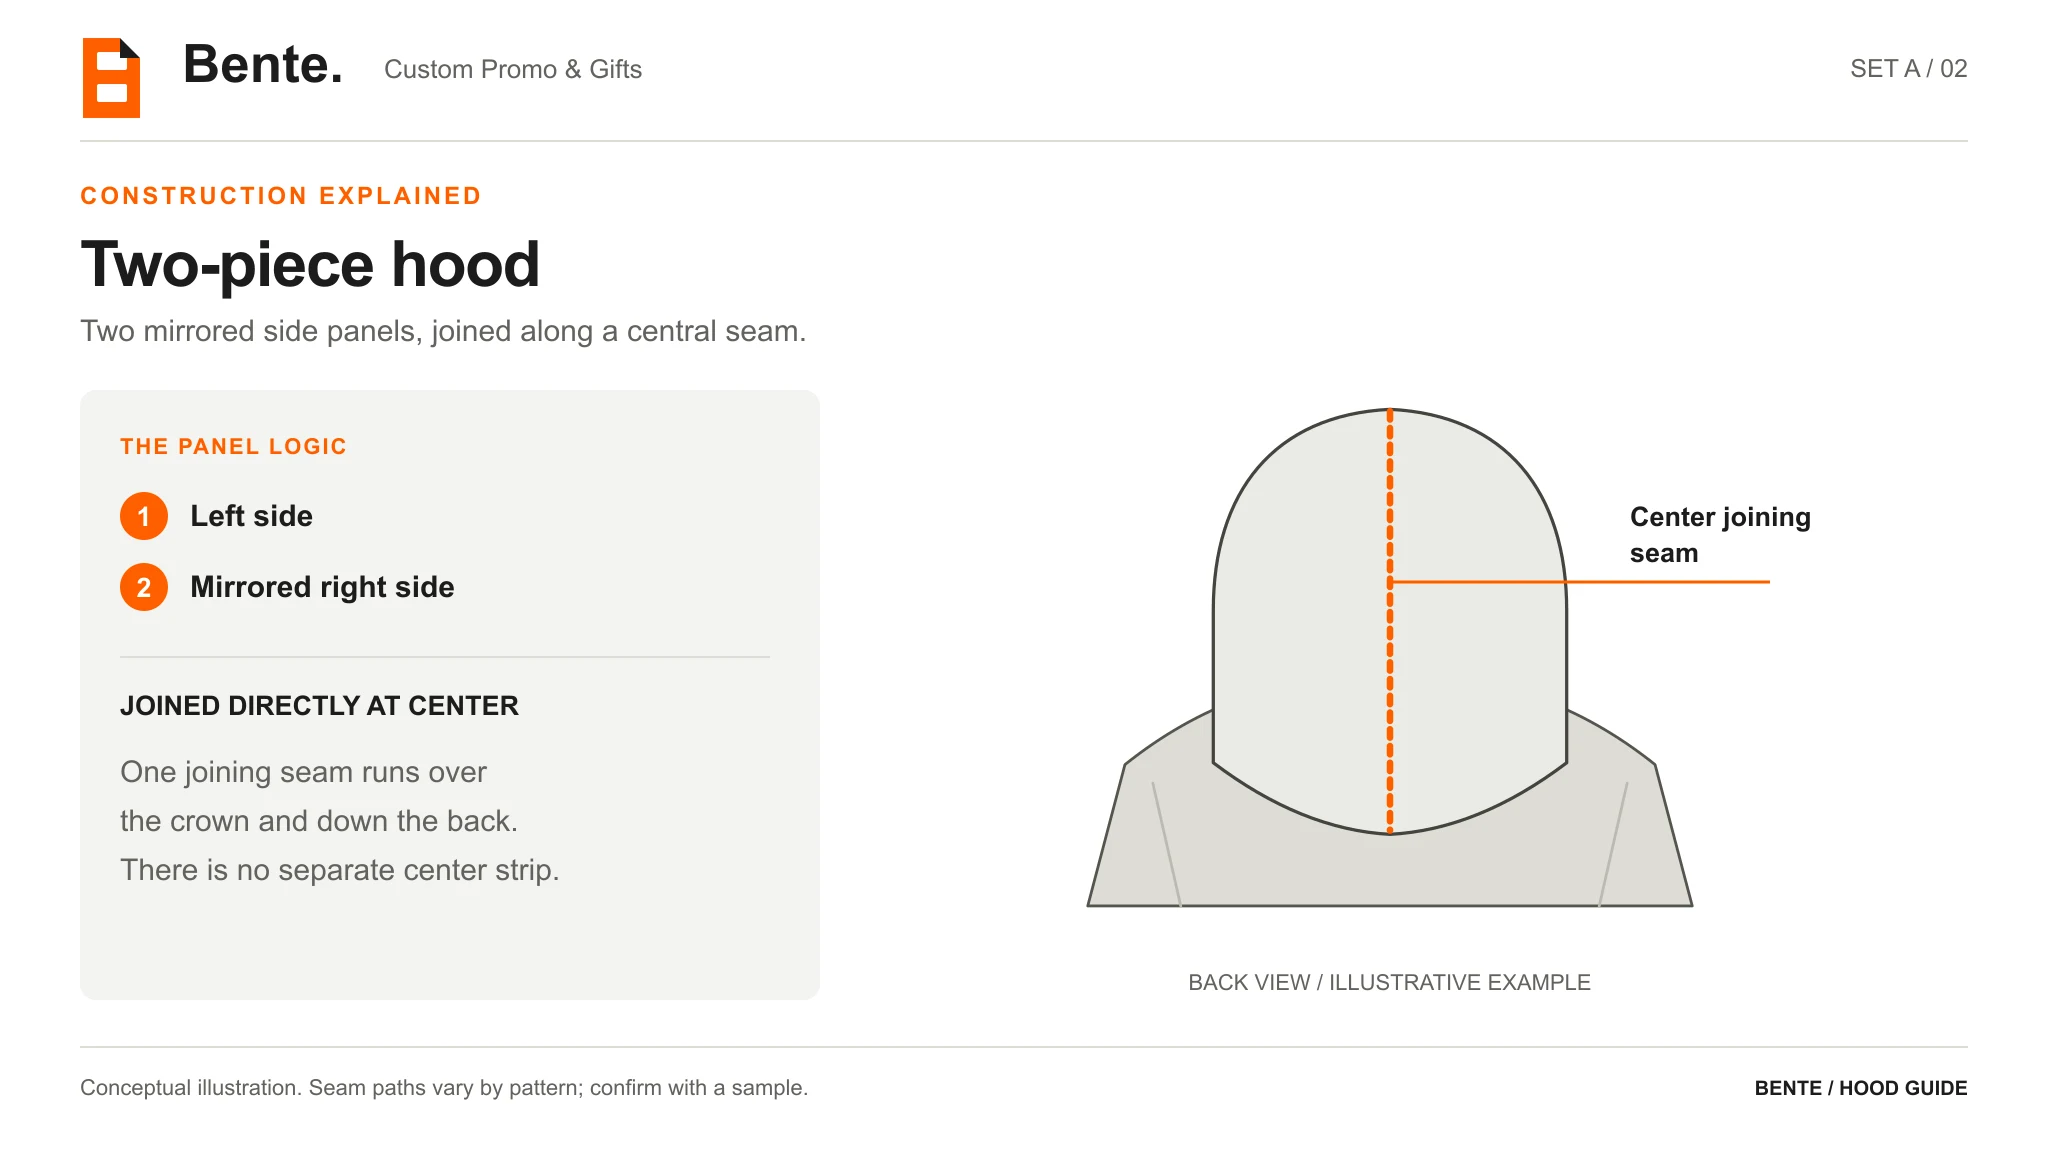
Set A / 02: two mirrored shell panels, with the central joining seam highlighted.
Put it on your shortlist when: a centered seam is compatible with the appearance you want, or you want a clear construction baseline for comparing samples.
Ask the factory: “Please show the center seam and the finished crown profile. Can you match the silhouette in my reference rather than just the number of panels?”
Check the sample: Look at the crown from the side as well as from behind. If the result is too pointed, too shallow or too loose for your brief, identify that specific problem instead of assuming the panel count alone explains it.
This is a sensible comparison option when you have not yet committed to a distinct seam arrangement. That is a development recommendation, not a claim that two-piece is universally the best or cheapest choice.
Three-piece hood: explore a distinct center panel
A three-piece hood adds a separate center panel between two side panels. Two joining seams frame that middle section. The center of the crown is therefore fabric, rather than the single joining seam found on a two-piece hood.
The reference video presents this construction as a way to explore more volume and a sportier appearance. Treat that as a design possibility, not a rule: the pattern and the finished sample still need to deliver your intended look.
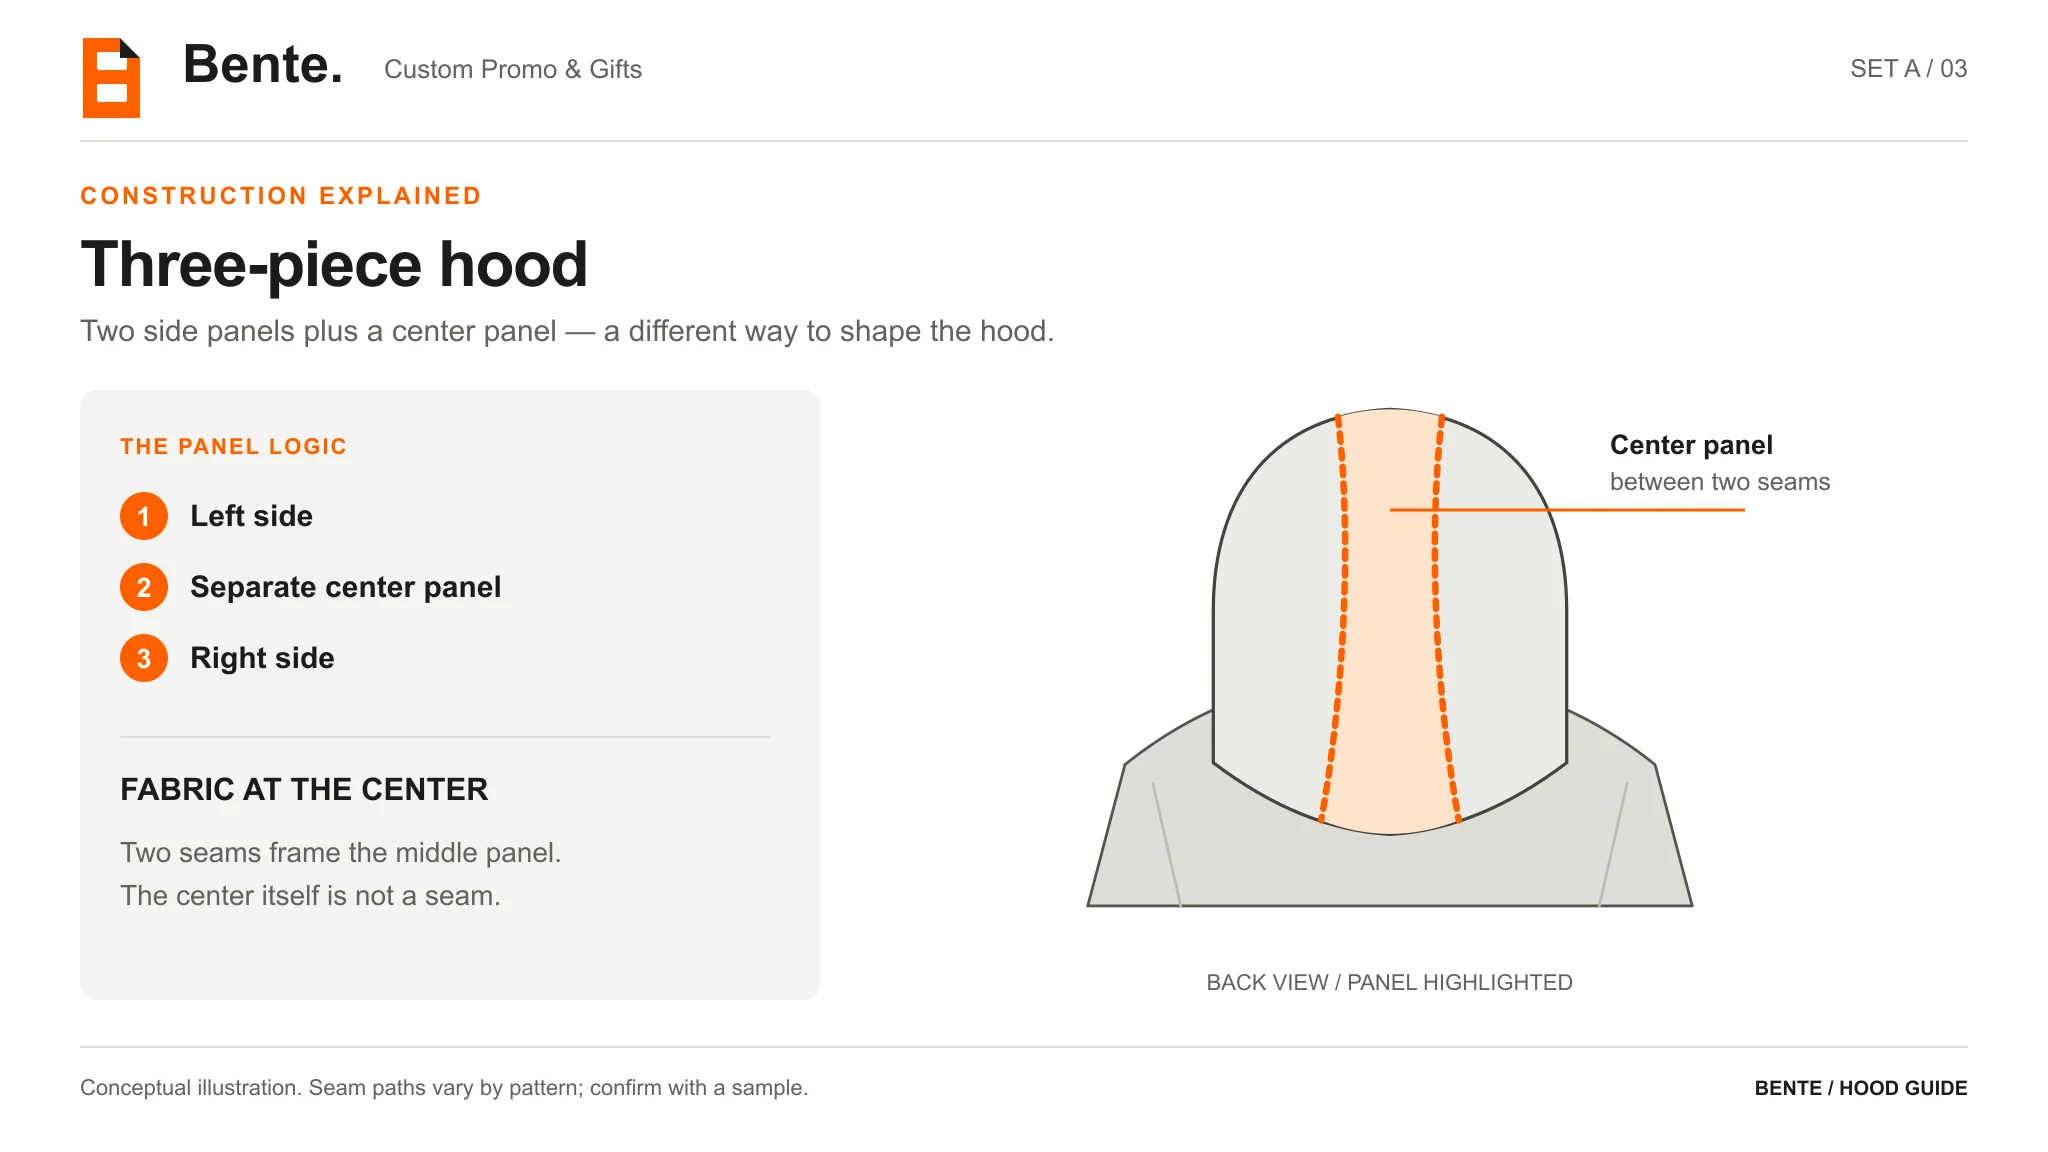
Set A / 03: the center panel is highlighted for explanation. This is not a required color-blocking treatment.
Put it on your shortlist when: you want a visible central panel or want to explore the crown shape through a separate middle section.
Ask the factory: “Please show the center-panel width and how it changes from the front toward the back. I want to compare the profile with my reference.”
Check the sample: Is the panel proportion right for the overall garment? Does the hood look too bulky for the body? Do you like the two seam lines when the hood is up and when it is down?
Do not equate three pieces with a guaranteed better fit. For a concrete construction example, Mood’s Forest Park Hoodie tutorial shows a center section joined to side sections, then repeats the hood construction for a separate lining. It illustrates why panel layout and lining must be specified separately.
Choose by the result you want—not by a quality ladder
Here is a practical way to narrow your shortlist.
“I want the crown to look as uninterrupted as possible.” Explore the one-piece example first, and ask to see the actual rear shaping seam. Keep a reference photo in the brief so “clean” has a visible meaning.
“I am comfortable with a center seam.” Start with a two-piece sample. Concentrate on the crown profile, opening and how the hood rests on the upper back.
“I want a defined middle panel.” Explore a three-piece construction. Review both the panel proportions and the finished volume; do not approve it by name alone.
“I am making an oversized hoodie.” Do not automatically select three-piece. Specify the desired hood size and appearance relative to the body, then compare samples that pursue the same target. “Oversized” is a design direction, not a panel count.
“I have a tight budget.” Ask for comparable quotations using the same fabric, lining, finish, quantity and other agreed details. Without those quotations, there is no reliable price ranking to attach to the three labels.
Want this hood on your own hoodie? We develop custom heavyweight hoodies from 100 pieces - send your reference and target quantity for a factory quote, then approve the construction on a physical sample. Request a Quote
Specify the rest of the hood before sampling
Panel count is only one line in the development brief. Give the factory enough information to show what you actually mean.
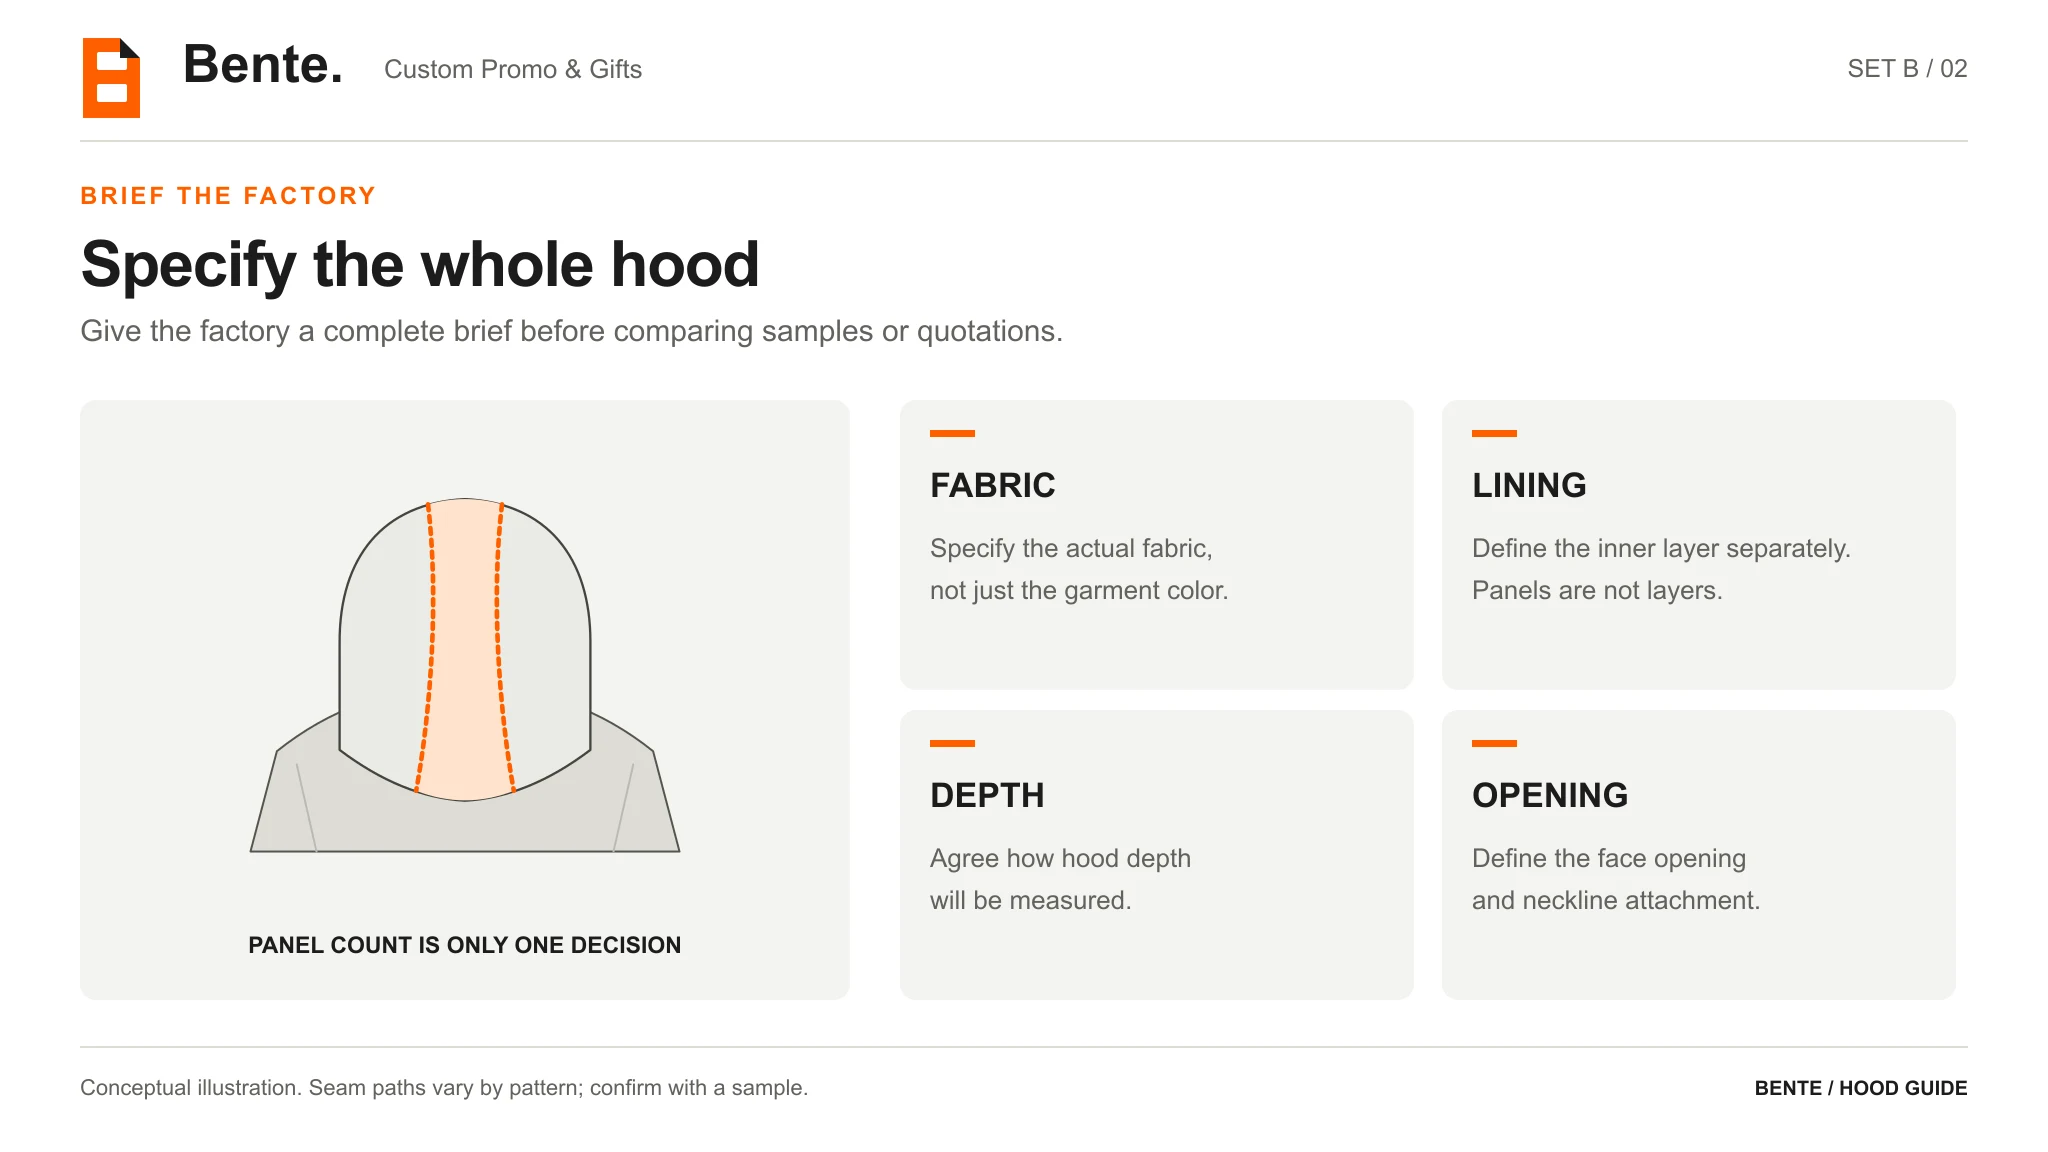
Set B / 02: specification topics, not measured dimensions or performance ratings.
- Fabric: identify the intended fabric or supply an approved reference swatch. If the fabric is not chosen yet, make that an explicit open decision.
- Lining: state whether a lining is wanted and identify it separately from the outer shell. Do not use “double-layer” as a substitute for the panel layout.
- Depth and height: agree on the measurement method and the intended proportions. Use measurements from your approved sample or specification, not values guessed from a photo.
- Face opening: show the preferred opening shape and the clearance you want to review on the wearer.
- Neckline attachment: include the front overlap or other attachment detail shown in your reference.
- Decoration: mark the exact proposed location of any hood artwork. Ask for a placement mockup that shows nearby seams before approving it.
All of the above applies to our custom heavyweight hoodie program - MOQ 100 pcs, Pantone matching and custom labels.
If you are comparing two constructions, keep the brief as consistent as possible. Otherwise you may be reacting to a change in fabric or proportions rather than the seam layout you meant to evaluate.
Approve the sample in three conditions
A useful sample review is more specific than “This feels premium.” Record what you observed and what needs changing.
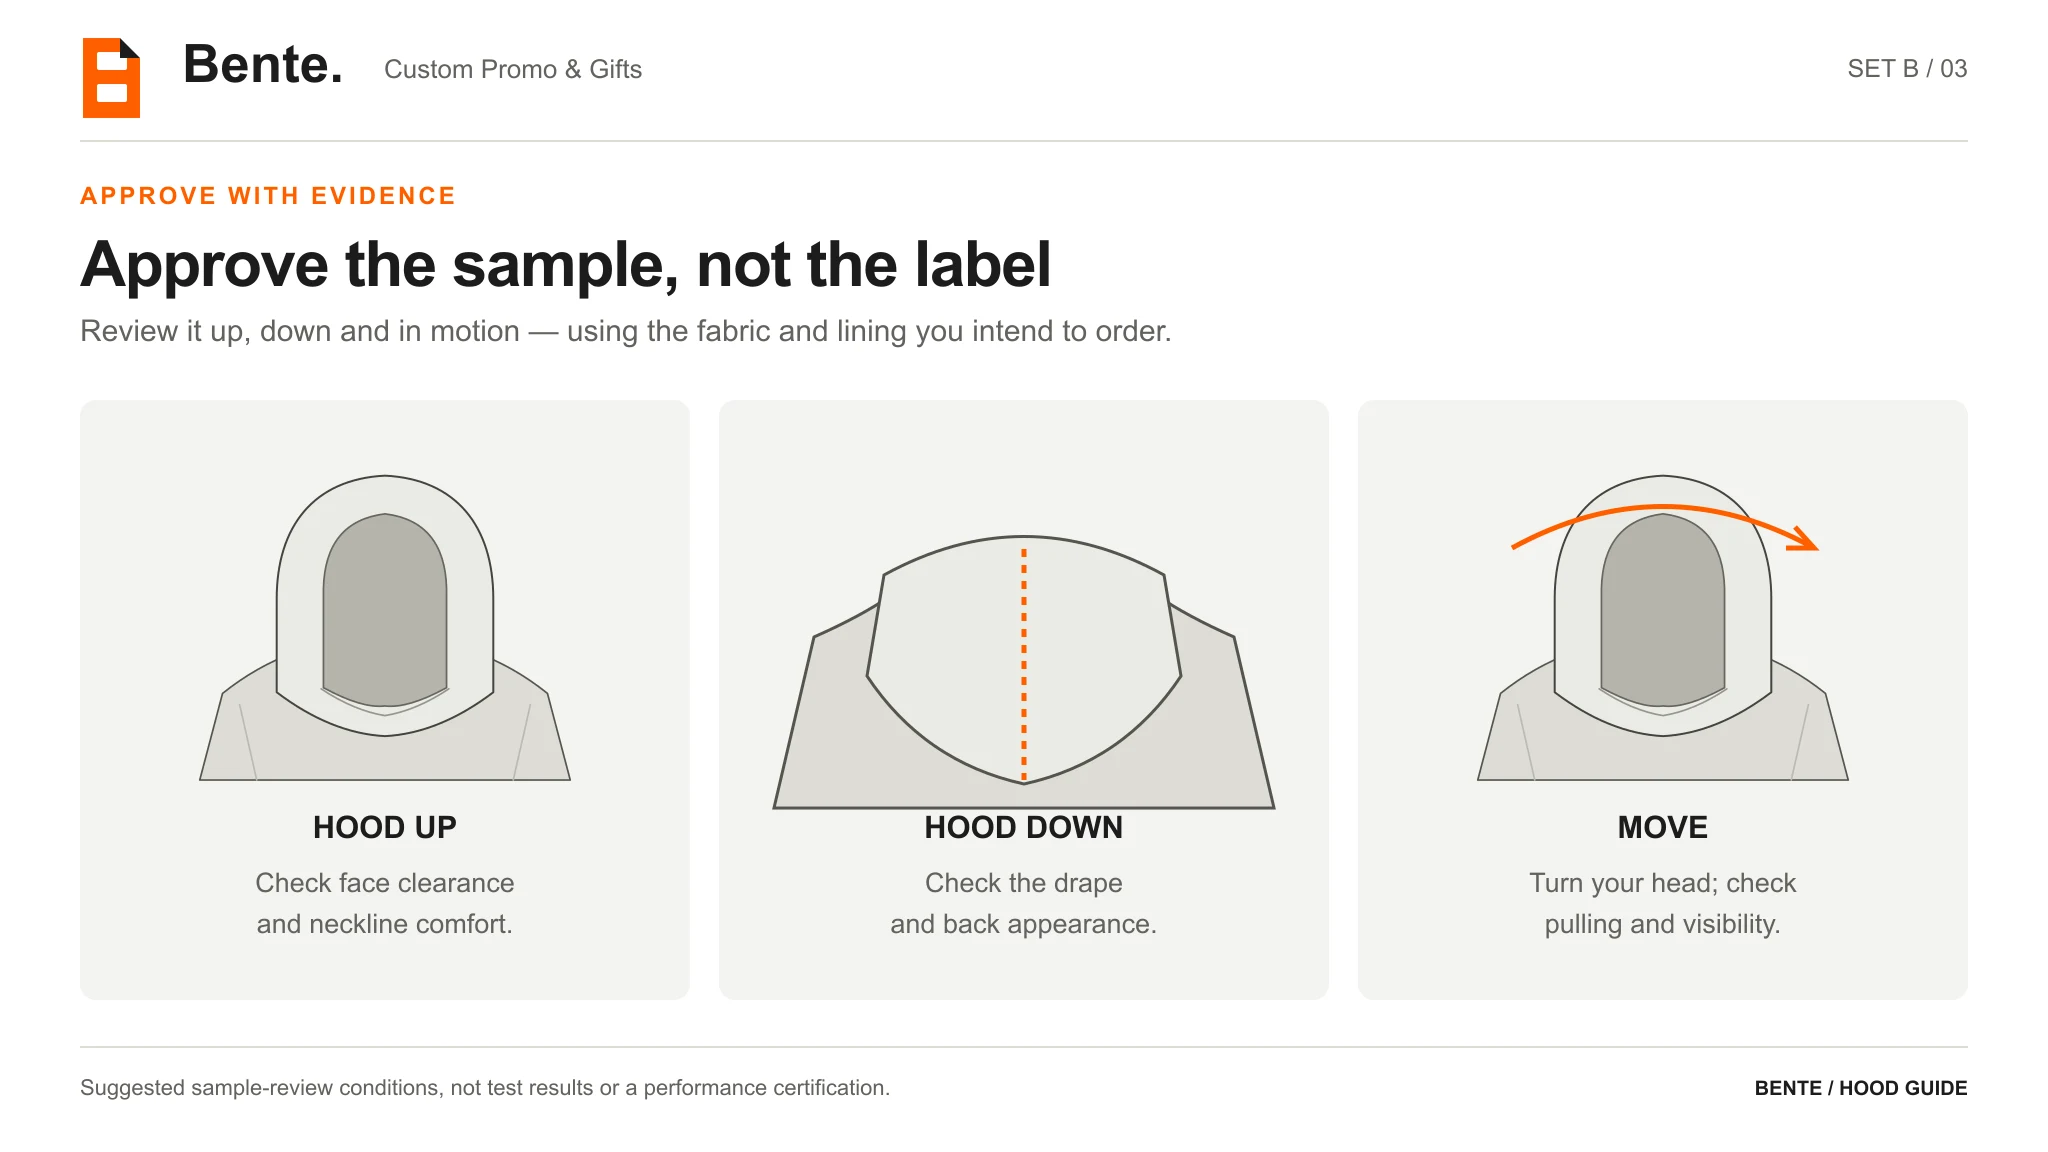
Set B / 03: suggested review conditions. These illustrations do not represent completed tests.
1. Hood up
View the front, side and back on the intended wearer or an appropriate fit model. Check face clearance, crown shape and neckline comfort. Identify the exact point that pulls, collapses or looks different from your reference.
2. Hood down
Let the hood rest naturally rather than arranging it for a photograph. Review its position on the shoulders and upper back. Check whether it covers artwork that should remain visible and whether the resulting silhouette suits the hoodie body.
3. In motion
Ask the wearer to turn their head and move normally. Note any pulling at the neckline, movement across the face or uncomfortable pressure. Request a revision based on that observation, not a vague request for “better fit.”
For final approval, review the agreed production fabric and lining, not just an early substitute. Mood’s tutorial also recommends a test garment in similar fabric while adjusting a pattern. Keep early development feedback separate from final approval of the actual specification.
If laundering is part of your approval process, agree on the care method and assessment criteria first, then record the before-and-after observations. Do not describe an unperformed wash check as passed.
A brief you can send with your reference
Copy these prompts into your development message and fill them with your own requirements:
- Intended wearer and use:
- Desired hood appearance, with front / side / back references:
- Preferred outer-shell construction, or options to compare:
- Required seam positions:
- Outer fabric reference:
- Lining requirement:
- Hood dimensions and agreed measurement method:
- Face opening and neckline detail:
- Artwork location, if relevant:
- What the sample must demonstrate with the hood up, down and in motion:
- Target order quantity and requested quotation scope:
Leaving an unresolved field clearly open is better than inventing a specification. A useful factory conversation can begin with a preferred silhouette and a shortlist of constructions.
Frequently asked questions
Is a three-piece hood always better than a two-piece hood?
No universal ranking follows from panel count. Three-piece introduces a center panel; two-piece joins the sides at the center. Choose the seam arrangement that suits the design and approve the resulting sample.
Is a one-piece hood seamless?
Not necessarily. The example in the reference material has a rear shaping seam. Ask for the exact seam map instead of interpreting “one piece” as “no stitching.”
Does a two-piece hood mean two layers of fabric?
No. Here it means two pieces forming one outer shell. Lining and layer count are separate specifications.
Which option should I choose for a premium hoodie?
Define what “premium” means in observable terms for your project: the silhouette, finish and wearing experience you intend to approve. Do not substitute a panel count for those requirements.
Can I select a hood from a photo alone?
Use the photo to communicate the visual target. Request additional views and a sample to confirm the construction and fit. A front photo alone may not show the joining seams you need to specify.
Ready to define your hoodie hood?
Send Bente your hood reference and development brief. Include what you like about the crown, the seam layout and the way the hood rests on the shoulders. If you are undecided, name the two options you want to compare rather than asking for an unspecified “better hood.” Start it on our heavyweight hoodie program or send the brief through the quote page — the design team replies with a development plan. Want to see your logo placement first? Try the free mockup studio.
The goal is not to order the most complicated construction. It is to approve a hood that looks and behaves the way your design requires.
References and illustration note
The one-, two- and three-piece examples were informed by a user-supplied hood-construction video. The original diagrams in this article simplify the visible construction concepts; they are not graded patterns, verified product photographs or instructions for cutting fabric.
The Forest Park Hoodie tutorial by Mood Sewciety provides a separate example of a three-piece shell and lining, plus test-garment guidance. Originally published December 24, 2025; the page records an update on September 17, 2026. No third-party pattern or video frame is reproduced here.
Related: Custom Beanies in Bulk: Cost, MOQ & Lead Time - How Much Does It Cost to Manufacture a Sweater - All apparel products